Brow Shaping 101: Map, Trim, and Fill Like a Pro
Master the pro brow routine: map precise points, trim safely, and fill naturally for balanced, face-framing arches that suit your features.
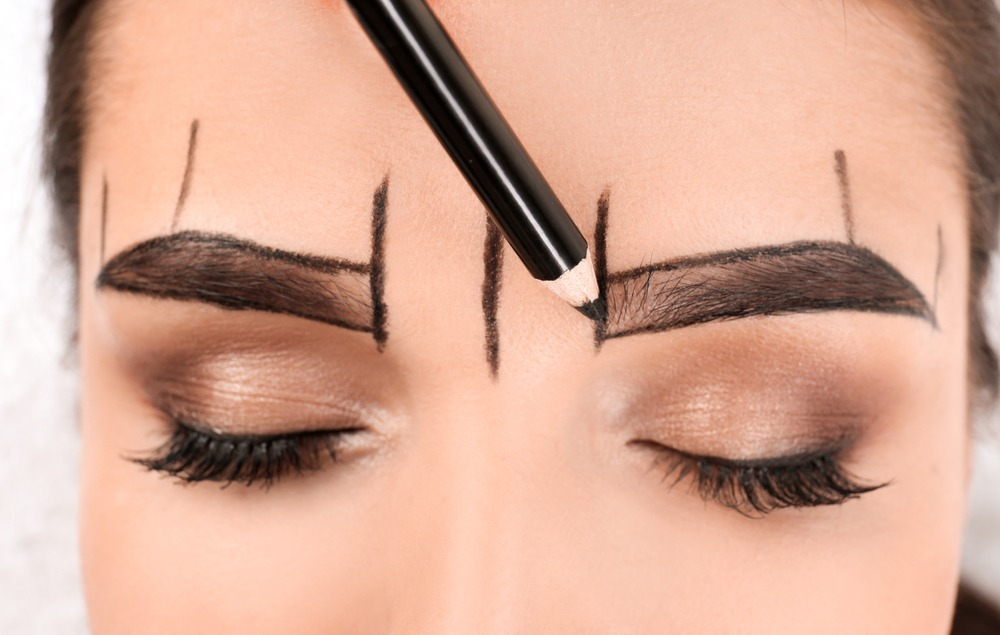
Brow Mapping Fundamentals
Mastering brow mapping lays the foundation for clean, flattering results. Start by facing a mirror and relaxing your forehead so your brow muscles aren't lifted. Use a thin brush or pencil to identify three anchor points: the start aligns with the side of your nose, the arch passes through the center or outer edge of your iris, and the tail points toward the outer corner of your eye. Mark soft dots at each point, then connect them with a faint guide line following your natural hair growth. Consider your face shape and the space between your eyes; small shifts in the arch's location can balance features or add lift. Keep tails slightly elevated to avoid a droopy effect, and resist pulling the start too close together, which can crowd the bridge. Aim for symmetry, but remember brows are sisters, not twins—prioritize balance over identicality. Take photos from different angles to spot subtle inconsistencies before you shape.
Trim and Shape with Precision
Thoughtful shaping begins with preparation. Cleanse the area, dry thoroughly, and work in bright, even lighting. Assemble tools: spoolie, mini scissors, and quality tweezers with a firm grip. Brush hairs upward and outward to see the natural line, then trim only the tips that exceed your mapped outline, snipping conservatively and horizontally for control. Follow a less-is-more approach; micro-trims are easier to correct than aggressive cuts. Next, tweeze stray hairs in the direction of growth, one at a time, pausing frequently to step back and reassess. Prioritize the area beneath the brow, preserving fullness above for a lifted effect. If you prefer threading or waxing, keep adjustments small and maintain your mapped guide as the boundary. Soothe skin afterward with a cool compress, and avoid heavy creams that can clog follicles. The goal is clean edges without sacrificing softness—refined minimalism that honors your natural structure.
Fill and Define Naturally
Filling brings structure to life. Choose formulas by need: pencil for precision, powder for softness, pomade for bold definition, and gel for hold. Color is crucial—match your undertone and select depth that complements your hair and complexion. Create hair-like strokes in sparse areas, mirroring the direction each section naturally grows. Keep the front of the brow airy and lighter, then build a gentle gradient toward the arch and slightly deeper tail. Use a spoolie to blend between each pass and soften any edges. If you want extra polish, lightly edge-clean with a tiny amount of concealer along the underside, diffusing the line so it looks lifted, not drawn-on. A clear gel can set the shape, while a tinted gel adds dimension by coating individual hairs. Avoid a blocky start or a sharp, downturned tail; subtlety reads more modern and flattering, allowing your bone structure to lead.
Care, Tools, and Routine
Sustainable results rely on consistent maintenance and smart care. Favor regular micro touch-ups rather than infrequent overhauls; it protects shape and prevents over-removal. Practice hygiene: sanitize tweezers, wash your spoolie, sharpen pencils, and cap gels to prevent drying. Store tools in a dry pouch to keep edges aligned and bacteria at bay. Support your brows with gentle cleansing and optional conditioning to keep hairs flexible and groomable, and remove makeup with upward, feather-light motions to avoid tugging. Use natural light where possible, and be cautious with ultra-magnifying mirrors—they can tempt heavy-handed trimming. If you're correcting past over-plucking, build patience into your plan and resist constant snipping while new hairs emerge. When in doubt, consult a professional for a tailored baseline shape, then maintain at home. Above all, prioritize consistency: the best brows evolve through small, thoughtful decisions that compound into a polished, effortless look.
Troubleshooting and Pro Secrets
Common brow challenges are solvable with targeted tweaks. For uneven arches, subtly lower the higher side by softening fill above the peak and lift the lower side with upward hair-like strokes and a touch of highlight beneath. If you over-trim the front, brush hairs up, set with clear gel, and sketch feathery strokes rather than drawing a hard square. For sparse tails, extend just beyond your map with a fine pencil, lock it with powder, and seal with gel for longevity. Create dimension by layering tones—slightly cooler strokes for depth and a neutral tinted gel to unify color. If shade looks off, practice color correction with either cooler or warmer gels until it harmonizes with your hair. For long-wear, anchor products with a light wax or primer and avoid touching your brows throughout the day. Build a compact kit for on-the-go fixes. Most importantly, aim for harmony with your features; confident, softly structured brows always read polished.